Hosted Authentication
This guide goes over how to authenticate accounts using Hosted Authentication.
Nylas Hosted authentication is the quickest and easiest way to set up user authentication for your app. Simply redirect users to a Nylas login page and we'll handle the rest including auto-detection of third-party providers and managing token exchanges. Once your user has authenticated, the account will have an access_token to make API requests.

When to Use Hosted Authentication
- You don’t care about customizing your application and are okay with Nylas showing on the authentication page.
- Need to create a test application with only a few users.
- Want to decrease development time by letting Nylas handle the authentication.
Quick Look at Hosted Authentication
There are 3 main steps to using Hosted Authentication with Nylas.
- Redirect your user to the Nylas Hosted authentication service.
- The user logs into their account and consents to the permissions your app requests. Nylas redirects them back to your app and provides the appropriate authorization credentials.
- Your app takes the appropriate steps to receive an access token for the account from Nylas and begins using it to make requests to Nylas on behalf of the user.
Step 1 Redirect the User
In your application, redirect your user to the Nylas Hosted authentication service, and include query parameters that specify scopes, a redirect URL, and the authorization flow. Make a GET request to /oauth/authorize.
The query parameters are:
- Client ID - The
client_idfrom your Nylas application. - Redirect URI - The callback URI or
redirect_uriis used to redirect the user back to your application after authentication. Add the redirect_uri in the dashboard Application > Application Settings > Callback URI. You also need to include the sameredirect_uriin your request. - Response Type - There are 2 response types;
- Code - Set the
response_typetocodeif you have a server-side application. Learn more aboutreponse_typein Step 3. - Token - Set the
response_typetotokenif you have a client_side application or a mobile app. Learn more aboutreponse_typein Step 3.
- Code - Set the
- Scopes - Review Authentication Scopes to see available scopes.
- If scopes are not specified, we will add default scopes.
- Redirect on Error - For errors during authentication, when
redirect_on_erroris set totrue, users are redirected to the specifiedredirect_uriwith additional query parameters for more info. Default value isfalse.
Error and Error Description Query String Parameters
If users encounter errors during authentication, the following query string parameters are included in the specified redirect_uri. Use the information from the table below to update your application for handling the errors.
error |
error_description |
|---|---|
unknown |
Unknown error |
invalid_request |
The request is missing a required parameter, has an invalid parameter value, has a repeated parameter, or is otherwise malformed. |
access_denied |
The user or authorization server denied the request. |
unauthorized_client |
The client is not authorized to request an authorization code using this method. |
unsupported_response_type |
The server does not support obtaining an authorization code using this method. |
invalid_scope |
Requested Google scopes denied by end user. Please retry the authentication process and ensure you tick the boxes to enable the specific scopes. |
server_error |
The authorization server encountered an unexpected condition that prevented it from fulfilling the request. |
temporarily_unavailable |
The authorization server is currently undergoing maintenance, or is otherwise unavailable and is unable to handle the request. |
Example Redirect URL
The URL below shows an invalid_scope error with the description included. Line breaks separate query string parameters for visibility.
http://example.com/nylas_callback?
error=invalid_scope&
error_description=Requested Google scopes denied by end user. Please retry the authentication process and ensure you tick the boxes to enable the specific scopes.
Example /Oauth/Authorize Request
This provided as an example. Users will need to log in on the webpage.
curl -G \
  --url 'https://api.nylas.com/oauth/authorize' \
  -H 'Authorization: Basic ENCODED_CLIENT_SECRET' \
  -d 'client_id=nylas_client_id' \
  -d 'redirect_uri=http://example.com/nylas_callback' \
  -d 'response_type=code' \
  -d 'scopes=email.read_only,calendar.read_only,contacts.read_only' \
  -d '[email protected]' \
  -d 'state=MyCustomStateString' \
  -d `redirect_on_error=true`
Once you make this API request, your users will be asked to consent to the authentication scopes listed in the request.
Learn More
A full list of query parameters can be found at /oauth/authorize.
Step 2 User Consent
With Hosted authentication, your user will log in using the email provider and consent to the permissions your app requested. Instead of needing to build this flow like in Native authentication, Nylas will automatically detect the provider and direct the user to the correct screen.
Nylas Logo
Users will see the Nylas name and logo at this stage. You can also upload an icon for your user-facing Hosted Auth page through your Nylas Dashboard.
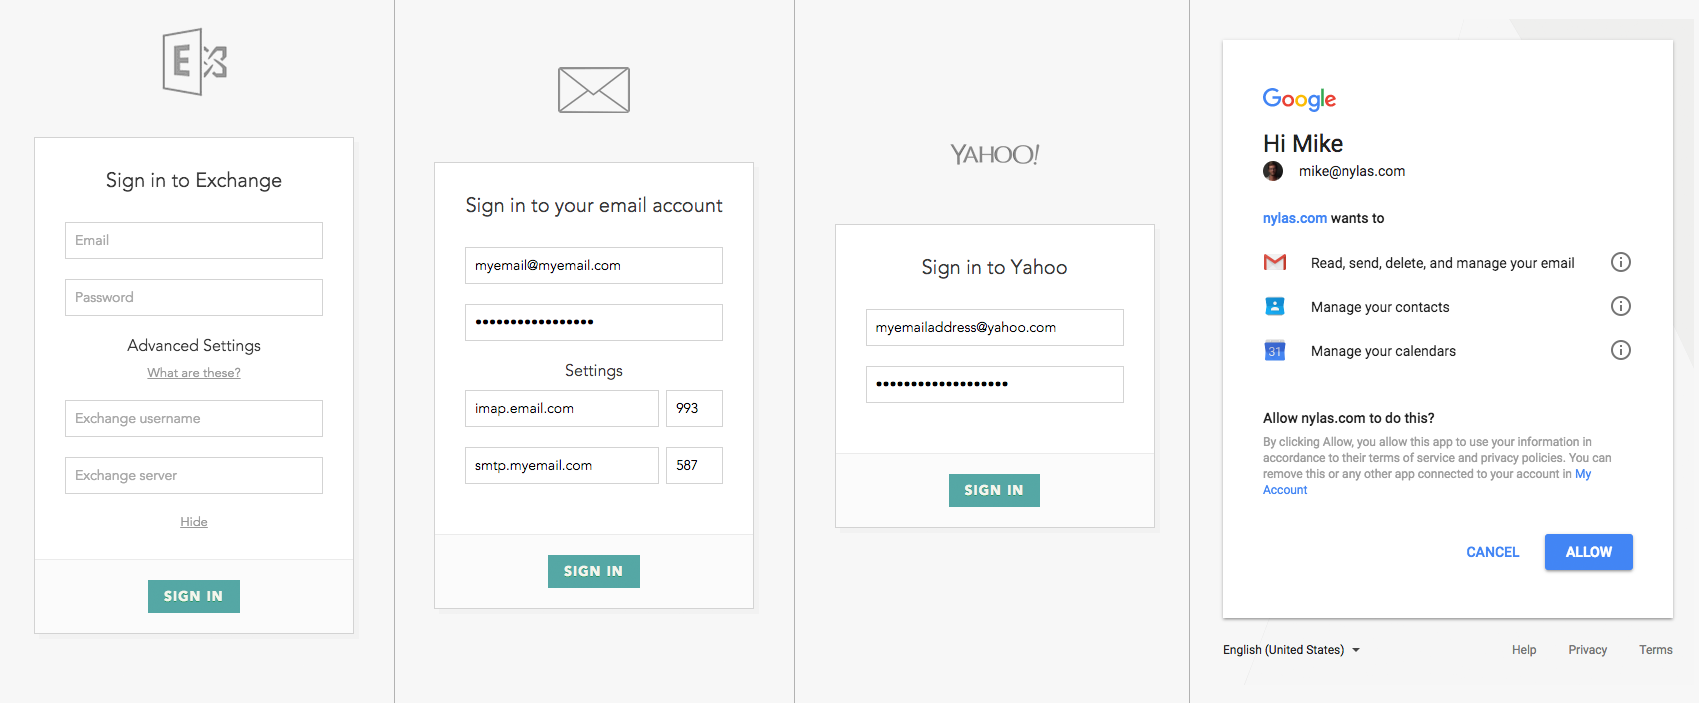
Auto-detect
If Nylas cannot auto-detect the user's email provider from their address, the user will see a provider selection screen first.
Step 3 Get the Access Token
Once the user has signed in, their browser will be redirected to the redirect_uri you provided, and Nylas stores the credentials securely and then returns the response_type.
In Step 1, you provided a response_type of code or token. Depending on which you chose, determines what authorization your application receives.
Client-Side Token
Use a response_type of token if you are using a client-side application or mobile app.
A response_type of token returns an access_token as a parameter in the query string.
Client-Side Token
That’s it! You are ready to make API requests on behalf of the user. We recommend storing the access_token and removing it from the URL fragment with JavaScript.
Server-Side Code
Use a response_type of code if you are using a server-side application.
A response_type of code will return a one-time use code in the query string that you can exchange for an access_token. This code is only valid for 15 minutes. After that time, the code will expire.
To exchange your code for an access_token make a POST request to /oauth/token.
The request parameters are:
- Authorization - The base64 encoded client secret from your Nylas application.
- Client ID - The
client_idfrom your Nylas application. - Client Secret - The
client_secretfrom your Nylas application. - Grant Type - This is always set to authorization_code
- Code - The
authorization_codereturned in the query string. This is a one-time use code.
Example /Oauth/Token Request
curl -X POST \
  https://api.nylas.com/oauth/token \
  -H 'Authorization: Basic ENCODED_CLIENT_SECRET' \
  -d '{
    "client_id": "CLIENT_ID",
    "client_secret": "CLIENT_SECRET",
    "grant_type": "authorization_code",
    "code": "AUTHORIZATION_CODE"
}'
Example /Oauth/Token Response
{
  "access_token": "aec7cad*************",
  "account_id": "d920**********",
  "email_address": "[email protected]",
  "provider": "eas",
  "token_type": "bearer"
}
Server-Side Code
Now that you have exchanged your authorization_code for an access_token you are ready to make API requests on behalf of your users.
Learn More
A full list of query parameters can be found at oauth/token.
Provider Auto Discovery
Nylas will attempt to identify the provider based on the provided information. If we are not able to, then during the User Consent step, they will be asked for information such as username, password, and host.
Keep Mind for Hosted Authentication
Now that you have learned how hosted authentication works, there are few things to think about before setting up hosted authentication.
- Decide if you want to make a server or client-side application
- Determine the scopes you need. If you need to change scopes, the user will have to reauthenticate.
Microsoft Troubleshooting
Microsoft products use mobile device management (MDM) policies. This can cause a maximum of two emails in the inbox and either to have quarantine notifications. The guides below help to resolve this issue.
Hosted Authentication Demo Apps
Take a look at our Hosted Authentication examples on GitHub.
What's Next?
Certain providers have extra requirements. Review the documentation for each.