Google authentication in Nylas v2
After you create a Google Cloud Platform application, the next step is to authenticate your app.
⚠️ Nylas recommends that you avoid using IMAP. IMAP has reduced functionality and will eventually be deprecated by Google.
What you'll learn
In this tutorial, you'll learn how to authenticate your Google app using either Hosted or Native auth.
Before you begin
Before you authenticate your Google app, complete the following prerequisites:
- Review our Hosted auth and Native auth documentation.
- Review our Google auth guide.
Authenticate your Google application
You can use either Hosted or Native auth to authenticate your Google app.
Authenticate your Google app with Hosted auth
Follow the steps in the Hosted auth documentation to set up Hosted auth for your Google app.
For more information about Hosted auth, see our API reference documentation.
Authenticate your Google app with Native auth
✨ Nylas v3 includes native support for OAuth 2.0 protocols. To learn more, see the v3 documentation.
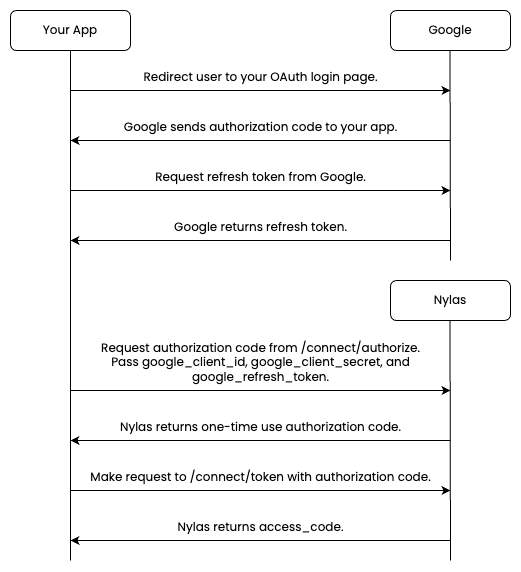
To use Native auth with your Google app, you need to get a refresh token from Google.
Refresh tokens are part of the OAuth 2.0 protocol, and they give you access to Google's APIs. You can use the Google API client libraries to automate the refresh_token implementation process.
📝 Note: Refresh tokens for GCP apps with the Testing publishing status expire after seven days. For more information, see Google's official refresh token expiration documentation.
For more information about Native auth, see our API reference documentation.

Follow these steps to authenticate your GCP app using Native auth:
-
Redirect the end user to your OAuth login page. Google sends an authentication code to your app.
-
Request a refresh token from Google.
-
Make a
POST /connect/authorizerequest using yourgoogle_client_id,google_client_secret, andgoogle_refresh_token, as in the example below. Nylas returns a one-time-use authorization code.curl -X POST https://api.nylas.com/connect/authorize -d '{
"client_id": "<NYLAS_CLIENT_ID>",
"name": "Nyla the Nylanaut",
"email_address": "nyla@gmail.com",
"provider": "gmail",
"settings": {
"google_client_id": "<GCP_CLIENT_ID>",
"google_client_secret": "<GCP_CLIENT_SECRET>",
"google_refresh_token": "<GCP_REFRESH_TOKEN>"
},
"scopes": "email.read_only,calendar.read_only,contacts.read_only"
}' -
Make a POST /connect/token request as in the example below. Nylas returns an
access_tokenfor the account.curl -X POST "https://api.nylas.com/connect/token" -d '{
"client_id": "<NYLAS_CLIENT_ID>",
"client_secret": "<NYLAS_CLIENT_SECRET>",
"code": "<AUTH_EXCHANGE_CODE>"
}'
Example: Native auth for Google apps
The following example applications show how to implement Native auth for your GCP app using the Nylas SDKs:
Nylas scopes
Before you can publish your GCP project, you might have to take extra steps to comply with Google's OAuth 2.0 policies and complete their verification process. Be sure to request the most restrictive scopes that you need for your GCP application. If you request any of Google's restricted scopes, Google will require your application to complete a security assessment. This could extend your verification timeline significantly, or cause Google to fail your review.
For more information, see the Google verification and security assessment guide.
⚠️ Nylas doesn't allow the all-access mail.google.com scope. This scope grants complete access to all Gmail features. Google automatically rejects verification for GCP apps that include it, and makes you explain why you request access for the more granular scopes to complete verification.
If you change the scopes for your GCP app, your users will need to re-authenticate to review and accept the updated scopes.