Snowflake
Snowflake is a data cloud platform designed to simplify building and managing data warehouse and data lake solutions.
You'll learn how to add Snowflake as a Nylas Stream.
Prerequisites
Before you begin, you must create grants and an integration. Nylas recommends you review the following documentation, based on your data needs:
- Read the Google application documentation if you want to stream messages or grants from your connected Google accounts.
- Read the Azure application documentation if you want to stream messages or grants from your connected Microsoft accounts.
- Read the Zoom application documentation if you want to stream meeting transcripts from your connected Zoom accounts.
Create a New Connector
Set up tip
Keep your dashboard open because you'll be frequently referring to the information there.
- Go to the Nylas Dashboard and select Streams.
- Select Snowflake.
- Choose your data source.
- Keep your dashboard open, we'll move onto the next steps and let you know when you need to refer to the dashboard and when to enter information.
Snowflake Set Up
You'll need to create a Snowflake warehouse, database, and schema. We've provided a script you can copy into Snowflake and it will be set up for you.
Before running the script, keep the following things in mind:
- The script assumes the user has a role of
SYSADMINwhen executing. - Once you run the script and set up your Snowflake Connector, changing the fields will result in the data getting published to a different location.
- Create a strong password for
user_password. - The username must contain
NYLAS. Do not use the username for any other purpose.
- Log in to your Snowflake account. Copy your Snowflake account identifier. For example, if your URL is
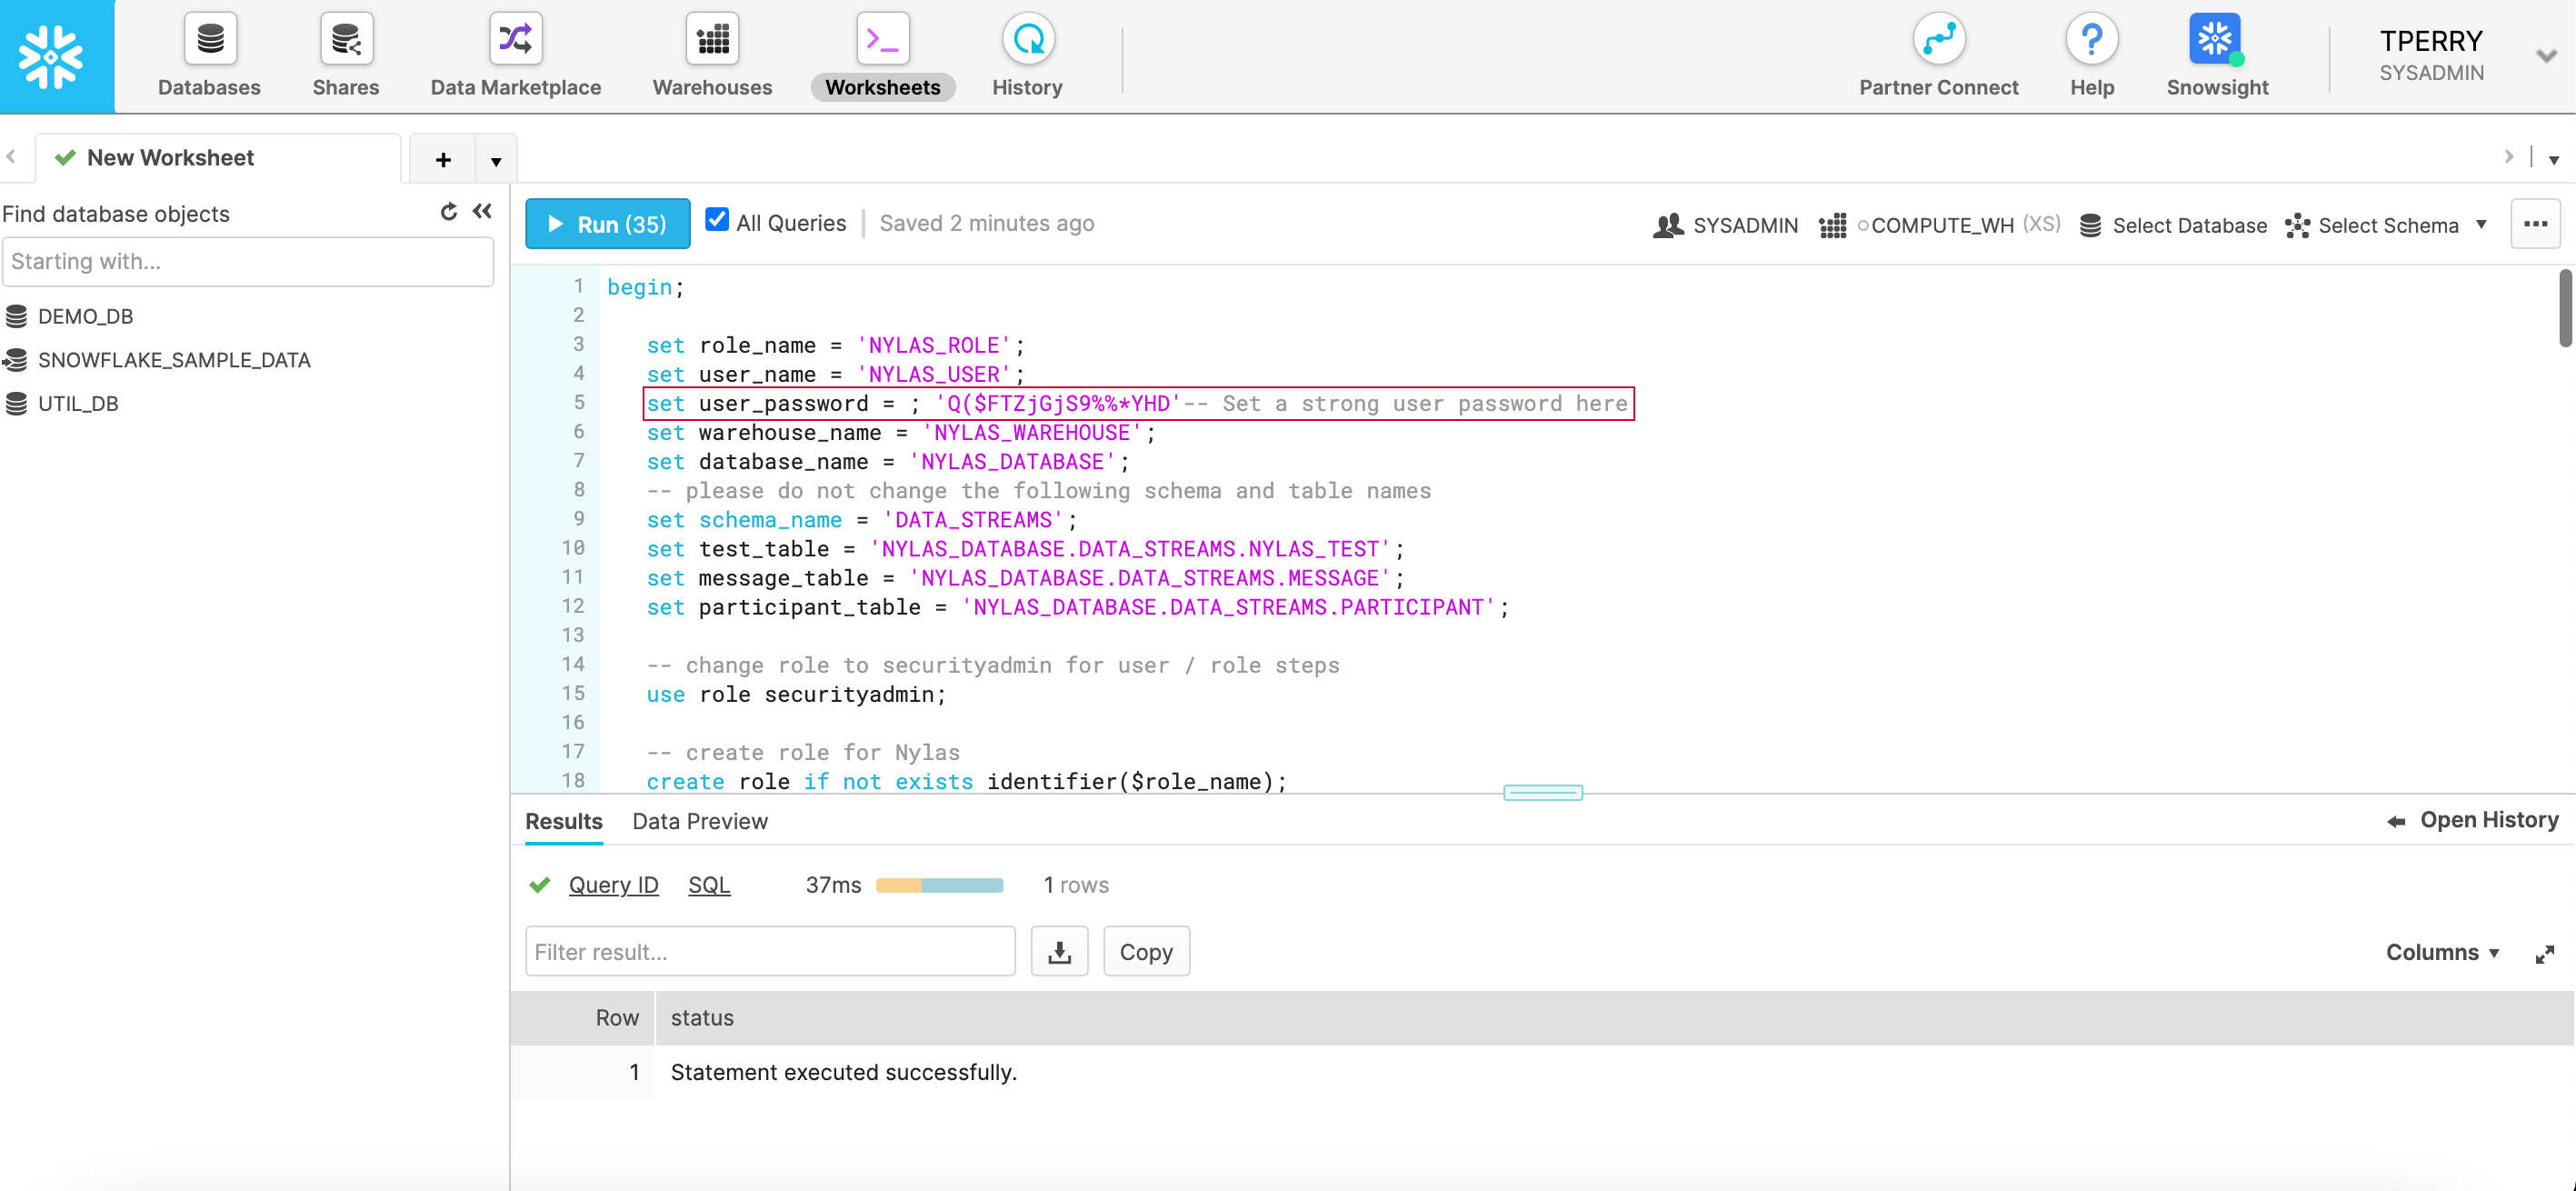
https://rx16875.us-central1.gcp.snowflakecomputing.com/, then your ID isrx16875.us-central1.gcp. Enter that in your dashboard in Snowflake Account Identifier. - Copy and paste the Snowflake script into the console.
- Make sure the logged in user is
SYSADMIN. - Update the
user_passwordon line 5 to a strong password. The script will not run correctly without it.
- Make sure the logged in user is
- Select All Queries in the console and Run.

Configure Nylas Dashboard
- In your Nylas dashboard, enter the following values. This assumes you are referring to the script in the console.
- Snowflake Account Identifier - The ID from your Snowflake URL.
- Snowflake Role - The
rolefrom line 3 of the Snowflake script. - Snowflake Username - The
user_nameon line 4 of the Snowflake script. - Snowflake Password - The
user_passwordon line 5 of the Snowflake script. - Snowflake Warehouse Name - The
warehouse_nameon line 7 of the Snowflake script. - Snowflake Database Name - The
database_nameon line 8 of the Snowflake script. - Snowflake Schema Name - The
schema_namefrom line 9 of the Snowflake script.
- Save your Stream. It will take a few minutes for the Stream to activate.
Configure the Snowflake Network Policy (Optional)
If you have a Snowflake Network Policy configured, you'll need to add Nylas' IP address.
52.33.15.8235.163.183.252100.21.76.215
Snowflake Default Network Policy
By default, Snowflake allows users to connect to the service from any computer or device IP address. A security administrator or higher can create a network policy to allow or deny access to a single IP address or a list of addresses.
Snowflake Script
The highlighted items are for you to include in the UI.
begin;

   set role_name = 'NYLAS_ROLE';
   set user_name = 'NYLAS_USER';
   set user_password = ; -- Set a strong user password here
   -- Please do not change the following fields
   set warehouse_name = 'NYLAS_WAREHOUSE';
   set database_name = 'NYLAS_DATABASE';
   set schema_name = 'DATA_STREAMS';
   set test_table = 'NYLAS_DATABASE.DATA_STREAMS.NYLAS_TEST';
   set message_table = 'NYLAS_DATABASE.DATA_STREAMS.MESSAGE';
   set participant_table = 'NYLAS_DATABASE.DATA_STREAMS.PARTICIPANT';

   -- change role to securityadmin for user / role steps
   use role securityadmin;

   -- create role for Nylas
   create role if not exists identifier($role_name);
   grant role identifier($role_name) to role SYSADMIN;

   -- create a user for Nylas
   create user if not exists identifier($user_name)
   password = $user_password
   default_role = $role_name
   default_warehouse = $warehouse_name;

   grant role identifier($role_name) to user identifier($user_name);

   -- change role to sysadmin for warehouse / database steps
   use role sysadmin;

   -- create a warehouse for Nylas
   create warehouse if not exists identifier($warehouse_name)
   warehouse_size = xsmall
   warehouse_type = standard
   auto_suspend = 60
   auto_resume = true
   initially_suspended = true;

   -- create database for Nylas
   create database if not exists identifier($database_name);

   -- grant Nylas role access to warehouse
   grant usage
   on warehouse identifier($warehouse_name)
   to role identifier($role_name);

   -- grant Nylas access to database
   grant create schema, monitor, usage
   on database identifier($database_name)
   to role identifier($role_name);

   -- change role to ACCOUNTADMIN for STORAGE INTEGRATION support
   --(ONLY needed for Snowflake on GCP)
   use role ACCOUNTADMIN;
   grant CREATE INTEGRATION on account to role identifier($role_name);
   use role sysadmin;

   use database identifier($database_name);

   -- Create schema
   create schema if not exists identifier($schema_name);

   -- Change schema ownership to Nylas
   grant ownership on schema identifier($schema_name)
   to role identifier($role_name);

  -- Create tables: Test, Message and Participant
   create table if not exists identifier($test_table)(
        test_data string  ,
        _synced_at timestamp_tz
    );

   create table if not exists identifier($message_table)(
    id string,
    grant_id string,
    subject string,
    body string,
    thread_id string,
    received_at timestamp_tz,
    _synced_at timestamp_tz
   );

   create table if not exists identifier($participant_table)(
    message_id string,
    type string,
    name string,
    email string,
    _synced_at timestamp_tz
   );

   -- Change ownership for all the tables to Nylas
   grant ownership on all tables in schema identifier($schema_name)
   to role identifier($role_name);

   -- Create stage and file format. PLEASE DO NOT CHANGE THE NAMES
   create or replace file format nylas_csv_format
   field_delimiter = none
   record_delimiter = '\\n';

   create or replace stage nylas_data_stream_stage
   file_format = nylas_csv_format;

   -- Change ownership for stages and file formats
   grant ownership on all stages in schema identifier($schema_name)
   to role identifier($role_name);

   grant ownership on all file formats in schema identifier($schema_name)
   to role identifier($role_name);

 commit;
Test Your Integration
Make sure you're able to receive data.
Message
If you selected message.create as your data source, create a new email message.
Snowflake Schema
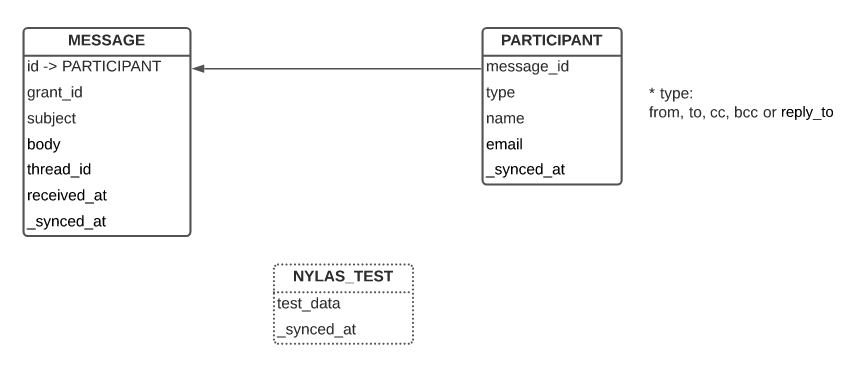
View the entity-relationship diagram below for more information about the database and state.
